Wednesday, December 2, 2009
Why Beyond Compare tool rocks
If a picture is worth a thousand words, here’s 10K worth for why you should check out Beyond Compare. It’s the one tool that I use every day I’m working at my computer. I’ve used it to compare not only files and folders but zip files to folders - it treats a zip like a folder and let’s you update the zip in situ. I’ve also used it to compare two Word documents, two Excel spreadsheets, MP3 files (tags), version stamps on executables. However, I wasn’t aware it could compare two photographs and show a “mask” of the differences between them!! It’s also the “external” tool I use for differencing in version control systems. If you earn your living using a (Windows or Linux) computer, how can you not afford to spend $50 to increase your productivity?
Thursday, November 26, 2009
Preparing CentOS 5.3 (LAMP) for Drupal 6 – Part 2
In the first article, I covered the basic steps for preparing a CentOS 5.3 installation for Drupal 6 by installing and configuring MySQL. This article covers the last quartet of the LAMP stack – PHP as well as initial installation of Drupal 6.
From a terminal console use the ‘yum’ utility to install the necessary PHP components:
yum install php-mysql php-gd php-imap php-ldap php-odbc php-pear php-xml php-xmlrpc
Next it’s helpful and common practice to create a PHP informational page to verify its installation using the Gnome text editor:
gedit /var/www/html/phpinfo.php
Paste or type the following then save and exit:
<?php
// Show all information, defaults to INFO_ALL
phpinfo();// Show just the module information.
// phpinfo(8) yields identical results.
phpinfo(INFO_MODULES);?>
Display the PHP information using the browser:

Scroll further down to verify that the Apache URL rewriting module is loaded:

This will be useful later for what is known in Drupal as “clean URLs”.
Implicit in the above instructions is the fact that the default location for the Apache web server document root folder is /var/www/html which means placing web files and folders under there makes them automatically served up by Apache and accessible via a web browser with no other special configuration. However, a common alternate approach is to create a separate Unix user account per installed application so that permissions and configuration settings are easily isolated to that account. This approach also facilitates remote development because it’s simpler and easier when enabling FTP access since Unix accounts typically have full access to their “home” directories. Doing it this way means a couple of extra steps when initially setting up the Drupal website but saves a ton of headaches in the future trying to enable access to the machine-wide directories under /var.
Earlier we created a MySQL database account called ‘drupal614’ (reflecting the current released version of Drupal). If you haven’t done so already, we’ll next create a Unix account with the same name:
useradd drupal614
passwd drupal614
After logging in as this new user, browse to the Drupal website and download the latest 6.x released version. Use the Nautilus file manager to open the .tar.gz file and extract it under the user’s home directory. Planning ahead for managing several versions, I chose to create a separate folder to hold websites (e.g. /home/drupal614/www/) so the full path becomes /home/drupal614/www/drupal-6.14.
At this point, we need to configure Apache to expose the Drupal directory by editing the httpd.conf file and adding entries:
gedit /etc/httpd/conf/httpd.conf
First we create an alias to the actual physical location on disk then we allow settings there to override the default settings for Apache by placing the following into the file at the end:

Next we edit the .htaccess file in the root of the Drupal install directory – uncomment the RewriteBase instruction and set the path to the alias we specified above in the httpd.conf file:

Now we should be able to follow the steps to grant write permissions outlined in the install guide then open a browser and navigate to the install page:
http://localhost/drupal614/install.php
You should see the initial page to choose a language:

The next page is where you’ll put in the database configuration information we had previously setup:

After setup is complete it is generally recommended to go into admin/settings/clean-urls and enable them if not already enabled:

At this point we have an installed and working version of Drupal! Subsequent posts will cover installation and configuration of various modules to achieve the level of functionality required for a high quality community site.
Preparing CentOS 5.3 (LAMP) for Drupal 6
Having just embarked on a side project to build a community website using Drupal 6 I decided to capture the steps both for documentation purposes and to help others who may seek to do the same. To begin with, CentOS is short for Community ENTerprise Operating System and is “an Enterprise-class Linux Distribution derived from sources freely provided to the public by a prominent North American Enterprise Linux vendor.” In other words this open source project takes the GPL-released RedHat sources and compiles them along with free, open source replacements for RedHat’s proprietary portions. Within the business community, it is widely popular because it is “just like” (just as good as?) the commercial version it is based upon.
On numerous occasions I have installed versions of CentOS on Microsoft’s Virtual PC and Hyper-V products as well as VMWare’s Workstation. In my opinion, it is far easier with VMWare’s built-in support however their workstation product costs around $180 whereas the Microsoft products are “free” with corresponding Windows licenses. Note however that VMWare Workstation is only necessary to initially build a new virtual machine instance. Once you have the guest OS installed, you can use their free VMWare Player to run the virtual machines. VMWare has a great program of “appliances” which are pre-built, pre-configured virtual machines ready for download and operation. In fact, there’s a CentOS 5.3 appliance ready to go – you just need to download then install VMWare Player and download the appliance and you’re up and running.
The Apache web server is already installed in the appliance and when you choose “server” if performing your own install. That leaves MySQL and PHP along with some configuration. Begin with MySQL by opening a terminal window (right-click on the desktop) and switching to the built-in root user (a.k.a. superuser):
su -
yum install mysql mysql-server
Once MySQL is installed enable it for autostart using:
chkconfig –levels 235 mysqld on
then start it manually this first time using:
/etc/init.d/mysqld start
Set the MySQL database login for root:
mysqladmin –u root password ‘PASSWORD-GOES-HERE’
Next log into the MySQL command processor and set the database name to use for subsequent commands:
mysql –u root –p
mysql> USE mysql;
Reading table information for completion of table and column names
You can turn off this feature to get a quicker startup with -ADatabase changed
At this point there’s some housekeeping that’s usually done to secure the database beginning with removing the anonymous accounts that let any connection to the database to happen.
mysql> DELETE FROM user WHERE User = '';
mysql> FLUSH PRIVILEGES;
Now look at the remaining contents of the user table:
mysql> select Host,User,Password from user;
+-----------------------+------+------------------+
| Host | User | Password |
+-----------------------+------+------------------+
| localhost | root | 44d0372963d3fb50 |
| localhost.localdomain | root | |
| 127.0.0.1 | root | |
+-----------------------+------+------------------+
3 rows in set (0.00 sec)
Note that the Password column contains a hashed (encrypted) value. To exit the MySQL command processor and return to the Linux shell use ‘quit;’ or ‘\q’:
mysql> quit;
Bye
Create a separate database login for a Drupal user (e.g. drupal614):
mysqladmin –u root –p create drupal614
This database account will be used to connect to MySQL and will “own” the tables and other artifacts created to support Drupal. Rather than using the separate mysqladmin from the Linux shell you can accomplish the same thing from within the MySQL command processor before quitting:
mysql> CREATE USER 'drupal614'@'localhost' IDENTIFIED BY 'drupal614';
Query OK, 0 rows affected (0.00 sec)mysql> GRANT ALL PRIVILEGES ON *.* TO 'drupal614'@'localhost' WITH GRANT OPTION;
Query OK, 0 rows affected (0.01 sec)mysql> CREATE USER 'drupal614'@'%' IDENTIFIED BY 'drupal614';
Query OK, 0 rows affected (0.00 sec)mysql> GRANT ALL PRIVILEGES ON *.* TO 'john'@'%' WITH GRANT OPTION;
Query OK, 0 rows affected (0.00 sec)mysql> flush privileges;
Query OK, 0 rows affected (0.00 sec)mysql> quit;
Bye
The above commands will create two database accounts – one for connecting from within the Linux machine and the second set for connecting to the Linux machine from another. This second account is useful if you wish to connect say from your Windows machine using a free utility such as DbVisualizer or SQuirreL SQL. The GRANT command is a lazy bit of a cheat in that it grants all permissions to the drupal614 account. Looking at the Drupal installation guide you’ll find a longer syntax which only grants the specific permissions that Drupal needs to connect and use the MySQL database.
This has been a quick whirlwind tour of the essential steps. I have only tried this twice – first as a trial and error practice and again using a fresh machine to validate that I had the specific steps worked out.
Next up will be the steps for installing PHP and Drupal.
Wednesday, September 2, 2009
How To Hack a New Integrated XP Mode Application
One thing I discovered about integrated applications is that only Windows installer-based applications will be “exported” from the XP Mode machine to the Windows 7 host. I decided to install the new Eclipse 4.5 release under (in?) XP Mode and it runs great there. Since I wanted to also have the nifty application shortcut on the Windows 7 start menu I looked around the ‘verse for how to do that but couldn’t find anything. I already had a few applications “exported” that way so I decided to try and hack the appropriate links together to make it work. Here’s the steps necessary to make it happen:
- Manually register the application in the Terminal Services Application Allowed List.
- Extract an icon (optional) to put on Windows 7 shortcut.
- Manually create the shortcut on Windows 7.
Note: These steps are (obviously) completely unsupported by Microsoft and have received limited testing. OK, I really only got this one application to work on one machine :) so use at your own risk!
Register the Application
Within the running XP Mode instance, you need to add entries in the registry under HKLM\SOFTWARE\Microsoft\Windows NT\CurrentVersion\Terminal Server\TsAppAllowList\Applications which appear to contain enough information to “auto-launch” the requested application. Here’s a screenshot of the entries I created for Eclipse:

Note the random key name, “cfc5bae5”, which I made up. By looking at other entries, I was able to create all the necessary values. One thing I did to be “safe” was to open a command prompt and use “dir /x” to ensure the short path name was correct. In the case of Eclipse it is only seven characters long so Windows doesn’t have to mangle the name to shorten it into “8.3” format. If you look at other applications registered there, you’ll see what I mean.
Extract the Icon
Since the Eclipse executable has its icon embedded within as do most Windows applications, I used the free IconsExtract utility from NirSoft to extract out the embedded icon and save it as an .ico file:
I then copied the extracted icon file out to the Windows 7 host drive using the default mapped drive letter automatically created for XP Mode.
At this point, I shut down the running XP Mode instance using the Windows Security link on its Start Menu. Simply closing the window or using Log Off leaves the virtual machine running and I wanted to be sure the test would work from a “cold start”.
Manually Create Shortcut on Windows 7
The machine-wide Start Menu shortcuts for Windows 7 are stored under %SYSTEMDRIVE%\ProgramData\Microsoft\Windows\Start Menu but you’ll only find the Windows Virtual PC and Windows XP Mode links there. Instead, all the application shortcuts are stored under your user profile’s roaming settings - %APPDATA%\Microsoft\Windows\Start Menu\Programs\Windows Virtual PC\Windows XP Mode Applications where %APPDATA% typically resolves to C:\Users\{yourLoginName}\AppData\Roaming\. If you look at the properties of an existing shortcut that was automatically exported you’ll find something like this one for Notepad++:
%SystemRoot%\system32\rundll32.exe %SystemRoot%\system32\VMCPropertyHandler.dll,LaunchVMSal "Windows XP Mode" "||6cab7fc4" "Notepad++"


Looking at the other shortcut entries I learned that the icons are stored under %LOCALAPPDATA%\Microsoft\Windows Virtual PC\Virtual Applications\Windows XP Mode where %LOCALAPPDATA% typically resolves to C:\Users\{yourLoginName}\AppData\Local\.

I’ve listed the steps in order from “inside out” – that is, from inside the virtual machine out to the Windows 7 host machine. However, the truth of the matter is that I worked backwards from outside in to figure it out. I first examined and compared a few existing Windows 7 shortcuts to realize that the string value played an important part – except for the application name, the rest of the shortcut commands were identical. I then fired up the XP Mode virtual machine and went right to the registry editor to search for one of those strings and hit pay dirt – I found the configuration within that contained all the necessary information to launch the application. The only piece left was a bit of polish to extract the icon so I could use it in Windows 7. Again, looking at other existing shortcuts I found where the application launch icons were stored and put the new one there.
Friday, August 7, 2009
WEI on Vista x64 vs. Win7 x64
I just finished installing Win7 RTM x64 on my Lenovo T61p and here’s the results of the Windows Experience Index (WEI):

Here’s the results “as delivered” last summer from Lenovo with Vista x64:

It’s basically the same machine – I say “basically” because technically there’s a different hard drive – both are SATA 7200 rpm. There are really two variables in play here – the different OS of course and different drivers.
As delivered it had all the Lenovo eye candy installed which I left pretty much left intact except for occasional system updates. With the fresh installation of Win7 RTM x64 I managed to get a working nVidia driver by using the latest Vista 64-bit version (ver. 7.15.11.7693, 2009/01/15) from their support site working. I was not able to the the official nVidia Windows 7 64-bit version (ver. 186.03, 2009/06/09) to install however they’ve labeled it a beta release.
Wednesday, April 15, 2009
Misguided usability “feature” in Safari


After reflecting for a moment it occurred to me there’s some nefarious programming going on here. It wasn’t a case of them whining about not using their home page, THEY EXPLICITELY CHECKED FOR AND ATTEMPTED TO STOP ME FROM USING GOOGLE AS MY HOMEPAGE!!! They also deflected the issue by directing me to the search bar as though it was a matter of searching. Firefox doesn’t do this. Internet Explorer doesn’t do this. I’m guessing that Opera doesn’t either although I haven’t tried Opera.
It dawned on my that they made an intentional decision to write code that would check if I was switching my home page to Google’s and attempt to warn me off. Someone actually thought up this “feature”, added it to the development tasks, assigned it to a developer to code, wrote a test plan for QA to verify the “feature”, informed the localization team so that it could be translated into however many languages the browser supports and shipped it! How many man-hours of production costs went into this “feature”?
Um…maybe the Apple team (and the users of the software) would be better served by more useful features like a simple, easy way to debug JavaScript instead of this. Today being April 15th in the U.S. I thought it was apropos to mention this little additional “line item” in the Apple Tax.
Tuesday, April 14, 2009
Debugging Safari on Windows
Truthfully, I had strongly considered titling this post “Drive by blogging” as a nod to a drive by shooting or “Blog rage” in deference to road rage because that’s how I felt this morning. I briefly considered “Why Safari sucks” as well. The fact is that compared to debugging under Internet Explorer or Firefox, Safari is still in the dark ages.


My issue with all this glitz is that IT’S FREAKIN’ NEAR USELESS!!! You can’t *DEBUG* JavaScript in a way that is considered modern, standard practice today. Unlike Internet Explorer with it’s developer add-in or Firefox’ Firebug add-in, you can’t set breakpoints and step through code, nor can you inspect variable values nor see a call stack to figure out where you’ve come from.
In fact, the above mentioned search yields as its number one result the Safari Developer FAQ which specifically answers the question - it’s #14 on the FAQ list. I’ll quote a bit of it here: “Safari 1.3 and above supports explicit logging of arbitrary information … by using window.console.log() in your JavaScript. All messages are routed to the JavaScript Console window and show up nicely in a dark green, to easily differentiate themselves from JavaScript exceptions.”
Gee, it bring tears to my eyes to think that 25 years ago when I first started programming in RPG II and Cobol-74 on IBM systems I could carefully insert debug logging code into my program and observe the values of variables when I re-ran the program and managed to bring it to the same state it was in that caused me to consider there’s a bug in there somewhere. It’s really great to know that the Apple team hasn’t strayed too far from the tried and true basics that have worked for so long. No wonder Safari is such a distant third in the browser market with the rest of the niche players – developers HATE working with it!!
On to my real gripe – if you really dig hard, you’ll come across the WebKit underneath Safari with instructions on how to build and debug it. There’s two itsy, bitsy things they don’t tell you in the Windows instructions…
- If you already have Cygwin for other things, forget about it. Rip it out and install their customized version mentioned in step 3. They’re not explicit about that and you will waste time otherwise. While I applaud them for making it somewhat turnkey, at least point out that they’ve got a custom configured version and that it’s the only way you’ll get it to work. Their wiki has a link to the “list” of packages (really just a pointer to the Perl source for the installer) but adding those packages to an existing Cygwin install still doesn’t work.
- The second dirty little secret they forgot to spell out…you *MUST* download the source under your home directory, e.g. /cygwin/home/<username>/WebKit. So /WebKit or /Src/WebKit, or /Repo/WebKit …none of these are allowed – there’s only one path structure that will work and it’s theirs. There’s plenty of path references inside their Perl scripts that assume this directory structure and will only work properly with it. I don’t necessarily have a problem with that, but I do have a problem with them not taking the extra minute to point this out clearly so as not to waste the time of others.
If you make either of these mistakes (or both, as I did) you will waste a lot of time and effort chasing missing things, strange error messages, and generally getting frustrated. Welcome to the wonderful world of free, open source projects – you get what you pay for…nothing!
Now on to debugging a JavaScript library that works beautifully under Internet Explorer and Firefox but not so much under he-who-must-not-be-named-browser.
P.S. Did you catch the hidden message? If you want to debug JavaScript running in Safari you need to download the source code for the browser, configure a proper build environment, then run the browser in the debugger. Ooh-rah! Only way to be productive.
Sunday, March 8, 2009
.NET Adventure - Business Layer (part 2)
This post is part of a series on building a complex .NET application from scratch. In part 1 I introduced business entities and refactored code out of the data layer. Now I'm going to build out the business logic and add unit tests to support it.


Since a customer address doesn't have business meaning outside of a customer I've decided not to expose a Customer Address business object. Instead, the few needed methods for manipulating the addresses have been added to the Customer business object. As the code shows, the object is "smart enough" to retrieve, set, and store associated addresses.
Notice that the Customer business entity (a.k.a.the data transfer object) is passed by the CustomerBO business object to the CustomerDAO data access object. The data access object "knows" how and where to persist the attributes of a customer, including the associated addresses. Another approach might be to have the business object, CustomerBO in this case, decompose the business entity and make decisions regarding what to store. Doing so introduces other side effects such as the business layer needing to manage transactional semantics when called upon to store information. That is, if the business object decomposes a Customer entity into its component parts - a Customer and a CustomerAddress - it will have to invoke the data access layer twice, once to store the customer and a second call to the CustomerAddressDAO to store its data. In the event of a failure, the database could be left in an indeterminate state. The usual way to handle this possibility is to wrap both calls inside a transaction. This causes the business objects to have references to and use a transaction manager. The real question is does transactional storage semantics belong up in the business layer or down in the data layer.
Now that the original data layer has been refactored we can return to the unit tests. Firstly, the DataLayer tests have been updated slightly to create instances of a Customer business entity and pass to the CustomerDAO methods. A second set of tests have been added to test the business layer. Once again, by taking the time early on to put the testing framework into place, it is reaping rewards every time we make a change to the code. We're able to exercise each layer as we go and ensure that all the moving parts line up correctly.
The code for this version of the project can be downloaded here. You'll find the new Business Object project as well as updated unit tests.
Monday, February 9, 2009
.NET Adventure - Business Layer (part 1)
This post is part of a series on building a complex.NET application from scratch. In Parts 1, 2, and 3, I introduced the data layer along with tools like NUnit, NAnt, and FxCop to round out the project development. Today I'm going to cover the first part of the entity layer.

Generally speaking, the business layer is where the domain rubber meets the binary road - that is, you typically implement the domain model and logic there. It's called the "business" layer for good reason - it's the business view of the application. While you may have normalized the data storage to 3NF such that E.F. Codd would be proud were he still here, the business view of data is typically courser grained and models business or "real world" entities. For example, in AWLT we have a Customer table and a Customer Address table which translates into two separate classes in our data layer according to the rules of the Active Record pattern. However, a business view would consider them a single Customer entity having properties of name, email address, etc. *and* one or more addresses.

The Business Entities component is where you define these entities and the Business Components is where you implement the business logic. This separation of logic and data is different from a classic business object where the data and object are encapsulated in a single class. In a layered architecture the data will need to be accessed in several places so it is usually split out into its own Business Entity component thus the Data Transfer Object pattern serves the purpose of defining entities that can be shared between parts of the system.

The business entity classes can be implemented in different ways. First, they can simply be a sub folder within in a single business layer project perhaps with a separate namespace (e.g. NAdv.BusinessLayer.BusinessEntity) that is compiled into a single Business Layer assembly. The problem with this approach is that any other part of the application that needs to use a business entity (such as shown with the data layer above) must reference and have access to at runtime the business layer assembly. The further implication is that the presentation layer which "consumes" these business entities could reside on a Windows client machine and would need a copy of the business layer installed locally in order to "receive" the data from the service layer. Another way to implement business entities is to place them into their own assembly, which I've done.
The code for this version of the project can be downloaded here. You'll find the new BusinessEntity project, the refactored DataLayer project and the updated unit tests.
Friday, February 6, 2009
XBOX 360, Windows Media Center and Streaming Movies
Last weekend I decided to try setting up my Xbox 360 to play media stored on a separate server. While doing so I discovered a few tidbits that weren't obvious or clearly spelled out. I've got a "spare" laptop running Windows Vista Ultimate in my office. While I could move it down to the family room next to the T.V. it won't pass the WAF. No problem, I've got the house wired for networking so I'll just leave the PC where it is and run it from there through the Xbox using the Media Center Extender I've read about.
The first step I took was to go into the Media Center UI and add a "watched folder" (Tasks / Settings / Library Setup / Add Folder to Watch) for the shared folder I had already setup on the server. At this point, I can browse the library, select a movie and play it right there on the PC - so far so good.
To configure the Xbox to see the Media Center PC you have to "validate" the network settings on the Xbox. In my case, it couldn't "see" the Media Center PC. The troubleshooting section mentioned the game console and MPC have to be on "the same network". I suspect they mean the same network segment - it must be sending out a UDP broadcast. In my case the home wired network is 192.168.1.x but in the family room I also have a wireless access point with 4 Ethernet ports on the back which I've connected the Xbox to. The wireless router happens to be doling out 192.168.3.x addresses and sure enough, that's the IP the console has been assigned. Moving the Xbox off the wireless router and over to a wall plug on the "main" network segment (192.168.1.x) magically cured the problem.
Now I can go into the MCE menu on the Xbox and I'm seeing the blue UI for MCE - seems to be remotely controlling the MCE UI - cool! However, going into the video library, I can't see any movies. I next try "adding" the shared folder again but it can't even see the other server. Hmm...After hunting around I find a Microsoft KB article (932306) and learn that MCE has created a local user account named MCX1 when I added the extender. Ah ha! This local machine account on the MPC doesn't have permission to see/browse the shared folder on the server. Rather than mucking around with domain accounts I set up a local account on the server and grant permissions. Back on the MPC I create a batch script to map a shared drive letter using the account credentials I just set up on the server. I then changed the MCX1 account to assign this as the logon script and reboot to be safe. Now when the Xbox talks to the MCE service, the MCX1 account that's used can get to the server share.
At this point it looks like things are working. I can go into the Media Center menu on the Xbox and see the video library with the list of movies. Try to play one and...oops, unable to play. Digging around on the Internet I find out that the Xbox can't decode the Divx format - it only likes good ol' WMV encoded movies. Sigh. I chose Divx thinking it was a higher quality, better compression format that was more likely to be supported by a wide variety of devices. I then run across a couple of posts in forums indicating that this is a known problem but that you can stream from Windows Media Player just as well and that it transcodes and supports more formats. Instead of going into the fancy Windows Media Center menu on the Xbox and remotely controlling the MCE on the Media Center PC, you can choose the plain-looking green "Video Library" menu option and access the shared media library via the Windows Media Player route. Voila, movies now stream to the T.V. through the Xbox. No more getting up and swapping DVDs or worrying about scratches!
So why did the Media Center PC play the movies on the PC but Xbox wouldn't? Because I had installed the Divx player and codecs on the PC, it "knew" how to decode the format and play. Seems the Xbox can "control" the MCE remotely but the movie is sent down to the Xbox where it attempts to decode and play on the console. However, the Windows Media Player sharing automatically transcodes the movies on the fly while sending them to the Xbox.
Friday, January 23, 2009
Putting your eggs in one SATA basket
Dylan Beattie lamented over on his blog about RAID and it's problems. I, too, had experienced problems in the past and discovered some of the same issues. I have two possibilities that seem the least offensive - use *Windows* RAID which theoretically is not as fast as hardware-based but is portable to another running Windows machine. No longer are you tied to a particular board manufacturer's unique RAID solution.
In my case, I started with RAID 5 using the on-board controller from an NVidia N-Force motherboard only to have it keep crapping out. Finally, I went out and bought an Adaptec controller, backed up what I had, reformatted the drives for the new controller and then loaded on the data. After two more partial failures in two months I was at my wits end regarding RAID when I found a mention of using Windows-based RAID and freeing yourself from hardware tie-in. I knew that if something had happened to the Adaptec controller, I'd need to get another one in order to get access to the data "locked" in it's proprietary RAID scheme. With Windows, I was even able to move the drives from a Windows 2003 server over to a Windows 2008 server without losing data. Why? It's still NTFS and it's still their RAID system so any Windows server will do. The only downside I've found it that Microsoft only "exposes" RAID on their server products so if you're a real hard-core developer who installs server instead of workstation (oops, professional, no business!) then this is a workable solution for you.
What's more liberating than the RAID route is using virtual machines to develop with. I first began using them in 2003 when Microsoft acquired Connectix and began offering v5.5 for download on MSDN. Now, my "normal" machine configuration is a laptop with "desktoppy" applications - Office, Paint.NET, readers, tools, etc. along with virtual machines that have only the minimum required development tools. The development VM is not longer tied to a physical machine and backing it up is simply a matter of copying/compressing the *.vhd disk image file. If you leave a large-capacity USB drive attached to your workstation, you can make backups at will or at scheduled intervals. Wanna try the new VS2008? Maybe the VS2010 CTP? No problem! Just spin up a new VM and install there - no harm and nothing else is affected. If you go this route, I suggest you install a base image of Windows (XP SP3, Vista SP1, Server, whatever) and then shut down and back it up! Now, if you wish to try a new tool/environment then you restore/rename the backup and simply start installing the tools you wish. Note that I always use NewSID to both generate a random system ID and rename the machine.
Friday, January 9, 2009
First NH Code Camp Announced
Chris Bowen has just announced the first ever NH Code Camp on Feb. 28th...
"A Code Camp is a free, community-driven event that offers a great way to meet, share with, and learn from fellow developers in the local area. They began right here in New England and follow the basic ideas in the Code Camp Manifesto.
"A Code Camp is a free, community-driven event that offers a great way to meet, share with, and learn from fellow developers in the local area. They began right here in New England and follow the basic ideas in the Code Camp Manifesto.
.NET Adventure - Data Layer (part 3)
This post is part of a series on building a complex .NET application from scratch. In Part 2, I introduced the Enterprise Library configuration and as well as unit testing with NUnit. Today I'm going to cover static code analysis using FxCop and add NAnt to the mix.
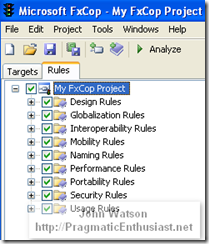 FxCop is a free tool that will analyze your code using a comprehensive set of rules grouped into nine different categories shown on the right. When I first threw together the code for this project and ran FxCop it immediately showed me all the bad habits I had - improper casing of fields vs. properties and method arguments, etc. Within a couple of minutes I had refactored things and brought the list down to just one - not having my assembly signed which I can live with for now. In fact, running it against a large project I'm involved with at my day gig turned up 450+ errors and warnings! To be fair, that project has had a lot of cooks in the kitchen and everyone has their idea of the One-True-Way™ when it comes to coding styles ;) That's the beauty of FxCop - it levels the playing field by not being emotional or stuck-in-the-mud about how things should be. The default rules it ships with are the accumulated best practices and standards employed by the Microsoft .NET engineers - talk about going straight to the source! Of course, you can edit the rules to change or disable ones you disagree with - however, my pragmatic side opted to conform so they're all on.
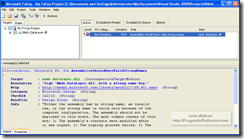 FxCop runs as a stand alone GUI where you simply reference "target" DLLs for it to analyze - I think of them as victims which it will mercilessly rip through exposing all their weaknesses. It also ships with a command line driver called FxCopCmd if you wish to invoke it from the command line - more on that in a moment. The main window is shown on the right with my one lonely violation remaining. Step back for a moment and consider what we have...a free tool with hundreds of pre-installed rules that will analyze your code, report the results complete with detailed information about the problem so you can write better code. 'Nuff said.
So far we've got a Visual Studio project for data access and two free, open source tools to make our code better, our lives easier and reduce the federal deficit. Ok, maybe not the last one. One issue us lazy developers need to overcome is...well, being lazy. Right now, we've got to remember to run these tools. But, wait! Before you pick up that phone to call we've got one more special gift for you...
NAnt is a free .NET build tool originally based on Apache's Ant tool for Java. It uses an XML configuration file to define build projects that can be executed from the command line. Where it shines is that we can continue to develop/debug/compile in the Visual Studio IDE but when we think we're ready to go we can use NAnt to run all the steps and tools without batting an eye and both hands tied behind its back. NAnt uses the notion of targets and tasks and has...you guessed it, a bunch of tasks already set up. For our purposes, it can launch MSBuild to compile the project the same as Visual Studio does, then launch NUnit to execute all our unit tests and finally run FxCop to make sure our code is clean, polished and ready for showing off.
Since NAnt is a mature tool there's plenty of information to be found by searching around and even a good book called Expert .NET Delivery Using NAnt and CruiseControl.NET if you really want to delve in. Rather than going through the scripts line-by-line I'm going to hit the high points and techniques I use.
Organization:
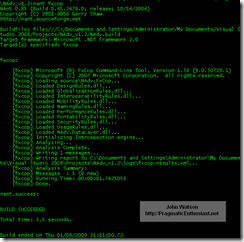
Here's what the output of running "nant fxcop" looks like on the console:
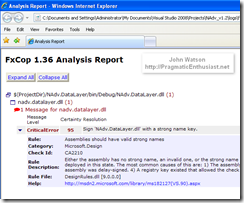
The FxCop results can be directed to an Xml file that contains formatting which looks like this:
The code for this version of the project can be downloaded from here. Note a couple of changes - the build output has been "tweaked" to NAdv_vX.X\bin which is "above" the source and test trees and the NAnt, NUnit and FxCop configurations/settings files are now included. If you unpack the zip file then open a command prompt in NAdv_vX.X (1.2 in this case) you should be able to execute "nant build, nant fxcop, and nant test" to execute all three targets. If you have problems, first check the console output and the log files and leave a comment if you're still stuck.
 FxCop is a free tool that will analyze your code using a comprehensive set of rules grouped into nine different categories shown on the right. When I first threw together the code for this project and ran FxCop it immediately showed me all the bad habits I had - improper casing of fields vs. properties and method arguments, etc. Within a couple of minutes I had refactored things and brought the list down to just one - not having my assembly signed which I can live with for now. In fact, running it against a large project I'm involved with at my day gig turned up 450+ errors and warnings! To be fair, that project has had a lot of cooks in the kitchen and everyone has their idea of the One-True-Way™ when it comes to coding styles ;) That's the beauty of FxCop - it levels the playing field by not being emotional or stuck-in-the-mud about how things should be. The default rules it ships with are the accumulated best practices and standards employed by the Microsoft .NET engineers - talk about going straight to the source! Of course, you can edit the rules to change or disable ones you disagree with - however, my pragmatic side opted to conform so they're all on.
 FxCop runs as a stand alone GUI where you simply reference "target" DLLs for it to analyze - I think of them as victims which it will mercilessly rip through exposing all their weaknesses. It also ships with a command line driver called FxCopCmd if you wish to invoke it from the command line - more on that in a moment. The main window is shown on the right with my one lonely violation remaining. Step back for a moment and consider what we have...a free tool with hundreds of pre-installed rules that will analyze your code, report the results complete with detailed information about the problem so you can write better code. 'Nuff said.
So far we've got a Visual Studio project for data access and two free, open source tools to make our code better, our lives easier and reduce the federal deficit. Ok, maybe not the last one. One issue us lazy developers need to overcome is...well, being lazy. Right now, we've got to remember to run these tools. But, wait! Before you pick up that phone to call we've got one more special gift for you...
NAnt is a free .NET build tool originally based on Apache's Ant tool for Java. It uses an XML configuration file to define build projects that can be executed from the command line. Where it shines is that we can continue to develop/debug/compile in the Visual Studio IDE but when we think we're ready to go we can use NAnt to run all the steps and tools without batting an eye and both hands tied behind its back. NAnt uses the notion of targets and tasks and has...you guessed it, a bunch of tasks already set up. For our purposes, it can launch MSBuild to compile the project the same as Visual Studio does, then launch NUnit to execute all our unit tests and finally run FxCop to make sure our code is clean, polished and ready for showing off.
Since NAnt is a mature tool there's plenty of information to be found by searching around and even a good book called Expert .NET Delivery Using NAnt and CruiseControl.NET
Organization:
- Use a nant.cmd batch script to handle validation, setup and avoid having to remember the command line switches
Use a main (or "driver") build script, called NAdv.build that sits in the solution root folder. Note that many folks like to change the default extension to .xml since it is in fact an Xml file. I prefer the default .build extension as I know instantly that it is the NAnt build script and that it is unique and special, not just some dumb old Xml file laying around in the folder tree.
- The main build script should setup all the properties and paths then use the <nant...> task to drive individual build scripts in the project subdirectories (e.g. NAdv.DataLayer.build). This gives you cleaner organization and manageability as well as allowing each project to be tailored accordingly.
Within a build script make a target called "help" AND MAKE THIS THE DEFAULT. An example output is shown on the right. <rant>I *hate* it when someone sets up an environment where you simply type in "nant" and all kinds of things start happening while the console scrolls by faster than the blink of an eye. I always think to myself "Uh-oh, what just happened. Did it build? Did it deploy and overwrite something?"</rant> It is much safer to show the help settings when someone types in "nant" and make them use an explicit build target (e.g. "nant build" or "nant deploy") - an intentional choice of what they wish to do.
Make "main" target names a single word, e.g. clean, build, deploy, and have these targets call "internal" sub-targets that are compound words, e.g. build.init, build.compile, deploy.web, deploy.database.
- Don't launch NUnit using NAnt's built-in <nunit2> task - use the generic <exec> task to run NUnit's console. NAnt and NUnit are different projects on different release schedules and NAnt is compiled against the version of NUnit that was available at the time it was built - NUnit 2.2.8 at the time of this writing. Using <exec> allows you to run the latest version of NUnit directly the same as when you do so interactively from the Visual Studio IDE.


1: Change the following line in *.csproj:2: <Import Project="$(MSBuildToolsPath)\Microsoft.CSharp.targets" />
3: To the following:4: <Import Project="$(MSBuildBinPath)\Microsoft.CSharp.targets" />
Here's what the output of running "nant fxcop" looks like on the console:

The FxCop results can be directed to an Xml file that contains formatting which looks like this:

The code for this version of the project can be downloaded from here. Note a couple of changes - the build output has been "tweaked" to NAdv_vX.X\bin which is "above" the source and test trees and the NAnt, NUnit and FxCop configurations/settings files are now included. If you unpack the zip file then open a command prompt in NAdv_vX.X (1.2 in this case) you should be able to execute "nant build, nant fxcop, and nant test" to execute all three targets. If you have problems, first check the console output and the log files and leave a comment if you're still stuck.
.NET Adventure - Data Layer (part 2)
This post is part of a series on building a complex .NET application from scratch. In Part 1, I introduced the Active Record pattern used to create data layer components. Today I'm going to wrap-up what I started by covering the Enterprise Library configuration, unit testing with NUnit and static code analysis using FxCop.
Microsoft's Enterprise Library "is a collection of reusable software components (application blocks) designed to assist software developers with common enterprise development challenges." Referring to the previous Common Application Architecture diagram, the "EntLib" would be placed on the far right as a "cross-cutting" technology. To begin with, I'm using it solely to provide low-level data access. At a minimum, you need to add a project references to the EntLib components, configure a data source and add code to use it.
For the data access references there is a standard Common library, a utility library called ObjectBuilder2, and the Data Access library:

Note that ObjectBuilder2 is new with version 4.x and was delivered as part of the Unity application block - more on that later. EntLib installs a custom Visual Studio designer as well as a standalone configuration editor. However, since we're using the Express Editions of Visual Studio and add-ins are not supported (hey, it's free!) the integrated designer doesn't work but we can use the standalone editor as shown here:
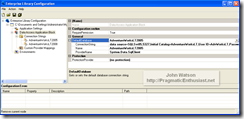
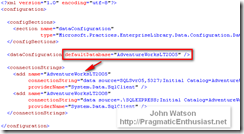
Simply launch the standalone editor from the Start menu shortcut and open the configuration file. Because .NET's app.config and web.config files can become "busy" with too many options, I prefer to use the EntLib feature of storing it's configuration in a separate file called "EntLib.config" that is referenced from the app.config:

Notice above that only one new section was added to app.config and in that section is the reference to the standalone EntLib configuration file - nothing else is needed there.
For completeness, here's the full EntLib.conf file as it exists at the moment:
To test this code we can turn to NUnit. Again, I'll say the goal of this series isn't to drill so deeply in one technology but rather to pull together various technologies into an end-to-end working application. Marc Clifton wrote a series of articles on Unit Test Patterns that is a good introduction to just how far one can go in designing and preparing tests. Suffice to say that this is a topic unto itself and that the tests I've shown are far from complete - more along the lines of simple black-box pass/fail tests. My goal was to lay the groundwork for testing the data layer and show how the layered architecture lends itself to this kind of quality, professional development that delivers resilient code. Using a testing framework/harness and some code you can immediately exercise the layer with relatively little effort.
 Since NUnit is a test harness or "driver application" that runs tests, you simply need to create standard .NET class libraries with classes that publicly expose the tests you wish to make available. As a starting point, you should at least write a test for each publicly exposed method that can be called externally. The testing assembly needs a reference to the NUnit.Framework assembly as well as your own projects that you'll be testing as shown here on the right.
You'll notice that I've also created an app.config and EntLib.config file here in the unit test assembly. While testing code, this assembly will be the controlling application so any references to configuration data will be found here in this project and not in the "lower-level" project being tested - the NAdv.DataLayer in this example. In fact, the configuration examples shown above were actually from the UnitTests project and not the DataLayer project!
Here's some simple code to test adding a new customer:
The [TestFixture] and [Test] attributes are NUnit's way of marking a class and method, respectively, to indicate that they are test code which it should execute. The AddCustomer() method is public, accepts no parameters and returns nothing to the caller (NUnit). The essence of the test is to construct an instance of the Customer class, set all the properties, and call the Store() method. While this is a contrived, hard-coded example it does show how little effort it takes to begin writing unit tests.
Because we're using the Express Editions of Visual Studio, some functionality is limited including the ability to configure custom debugging settings. In fact, the default installation shows a "basic" set of configuration settings on a project. You must use Tools | Options on the VS menu then select "Projects and Solutions" and check the "Show advanced build configurations" to be able to switch from Release to Debug builds or see additional project configuration options. Even after doing this you won't be able to specify the NUnit GUI as the application to launch when debugging. However, if you add the following two lines to the *.csproj file for your unit test project:

Above is the NUnit GUI showing the unit tests I've set up and run. Of course, the Zen of unit testing and TDD requires you to design your tests and APIs before ever writing a line of code - I won't lie to you and say I wrote these tests beforehand ;)
Since this post is already getting long, I don't want to set a trend so I'll stop here and discuss FxCop in the next post. The code for this version of the project can be downloaded from here.
Microsoft's Enterprise Library "is a collection of reusable software components (application blocks) designed to assist software developers with common enterprise development challenges." Referring to the previous Common Application Architecture diagram, the "EntLib" would be placed on the far right as a "cross-cutting" technology. To begin with, I'm using it solely to provide low-level data access. At a minimum, you need to add a project references to the EntLib components, configure a data source and add code to use it.
For the data access references there is a standard Common library, a utility library called ObjectBuilder2, and the Data Access library:

Note that ObjectBuilder2 is new with version 4.x and was delivered as part of the Unity application block - more on that later. EntLib installs a custom Visual Studio designer as well as a standalone configuration editor. However, since we're using the Express Editions of Visual Studio and add-ins are not supported (hey, it's free!) the integrated designer doesn't work but we can use the standalone editor as shown here:

Simply launch the standalone editor from the Start menu shortcut and open the configuration file. Because .NET's app.config and web.config files can become "busy" with too many options, I prefer to use the EntLib feature of storing it's configuration in a separate file called "EntLib.config" that is referenced from the app.config:

Notice above that only one new section was added to app.config and in that section is the reference to the standalone EntLib configuration file - nothing else is needed there.
For completeness, here's the full EntLib.conf file as it exists at the moment:

To test this code we can turn to NUnit. Again, I'll say the goal of this series isn't to drill so deeply in one technology but rather to pull together various technologies into an end-to-end working application. Marc Clifton wrote a series of articles on Unit Test Patterns that is a good introduction to just how far one can go in designing and preparing tests. Suffice to say that this is a topic unto itself and that the tests I've shown are far from complete - more along the lines of simple black-box pass/fail tests. My goal was to lay the groundwork for testing the data layer and show how the layered architecture lends itself to this kind of quality, professional development that delivers resilient code. Using a testing framework/harness and some code you can immediately exercise the layer with relatively little effort.
 Since NUnit is a test harness or "driver application" that runs tests, you simply need to create standard .NET class libraries with classes that publicly expose the tests you wish to make available. As a starting point, you should at least write a test for each publicly exposed method that can be called externally. The testing assembly needs a reference to the NUnit.Framework assembly as well as your own projects that you'll be testing as shown here on the right.
You'll notice that I've also created an app.config and EntLib.config file here in the unit test assembly. While testing code, this assembly will be the controlling application so any references to configuration data will be found here in this project and not in the "lower-level" project being tested - the NAdv.DataLayer in this example. In fact, the configuration examples shown above were actually from the UnitTests project and not the DataLayer project!
Here's some simple code to test adding a new customer:
[TestFixture]
  public class CustomerTest
  {
    [Test]
    public void AddCustomer()
    {
      Customer customer = new Customer();
      SetCustomerValues(customer);
      int customerId = customer.Store();
    }

    ... <snip> ...

    private void SetCustomerValues(Customer customer)
    {
       string timestamp = DateTime.Now.Ticks.ToString();

       customer.CompanyName = "AdventureWorks Unit Test " + timestamp;
       customer.EmailAddress = timestamp + "@adventureworks.com";
       customer.FirstName = "Unit";
       customer.LastName = "Test";
       customer.MiddleName = "A.";
       customer.NameStyle = NameStyleValue.Western;
       customer.PasswordHash = "L/Rlwxzp4w7RWmEgXX+/A7cXaePEPcp+KwQhl2fJL7w=";
       customer.PasswordSalt = "1KjXYs4=";
       customer.Phone = "1234567890";
       customer.Salesperson = "Salesperson " + timestamp;
       customer.Suffix = "Jr.";
       customer.Title = "Mr.";
    }
  }
The [TestFixture] and [Test] attributes are NUnit's way of marking a class and method, respectively, to indicate that they are test code which it should execute. The AddCustomer() method is public, accepts no parameters and returns nothing to the caller (NUnit). The essence of the test is to construct an instance of the Customer class, set all the properties, and call the Store() method. While this is a contrived, hard-coded example it does show how little effort it takes to begin writing unit tests.
Because we're using the Express Editions of Visual Studio, some functionality is limited including the ability to configure custom debugging settings. In fact, the default installation shows a "basic" set of configuration settings on a project. You must use Tools | Options on the VS menu then select "Projects and Solutions" and check the "Show advanced build configurations" to be able to switch from Release to Debug builds or see additional project configuration options. Even after doing this you won't be able to specify the NUnit GUI as the application to launch when debugging. However, if you add the following two lines to the *.csproj file for your unit test project:
<StartAction>Program</StartAction>
<StartProgram>C:\NUnit 2.4.8\bin\nunit.exe</StartProgram>
within the <PropertyGroup> for the Debug configuration you'll be able to press 'F5' to start debugging and the NUnit GUI will launch. Now, because the Visual Studio debugger has launched you can set breakpoints in your code and step through it just like the "big boys" do using Professional and Team editions.

Above is the NUnit GUI showing the unit tests I've set up and run. Of course, the Zen of unit testing and TDD requires you to design your tests and APIs before ever writing a line of code - I won't lie to you and say I wrote these tests beforehand ;)
Since this post is already getting long, I don't want to set a trend so I'll stop here and discuss FxCop in the next post. The code for this version of the project can be downloaded from here.
Monday, January 5, 2009
.NET Adventure - Data Layer (part 1)
Rather than spending the time drawing ugly stick men so to speak (I can't draw very well) I'm going to refer to the Common Application Architecture shown in Chapter 3: Architecture Design Guidelines of Microsoft's patterns & practices Application Architecture Guide 2.0 (The Book):
I plan on working my way from the bottom up. It's possible to take a different approach - a BDUF will allow multiple teams to work in parallel assuming the contracts between the layers are well-defined. For a data source I'll be using the Adventure Works LT sample database because it's a simple design and comes both pre-built and pre-populated. You can find documentation, the downloadable installers and a schema diagram for the database here on CodePlex.
Originally I installed AWLT on my local SQL 2008 Express instance however I kept getting "Must declare scalar variable..." errors using the technique I'm about to discuss. Since I have a full SQL 2005 Standard Edition instance running on another machine, I simply loaded the appropriate AWLT 2005 version onto it then changed the connection string and I was cooking. I didn't change anything in my code so one has to wonder if the two versions of the database are different or if the database servers behave differently. Having wasted over an hour chasing around trying to fix the error, I decided to pass for now and use the SQL 2005 instance. The goal isn't to become a SQL DBA here or study/debug the nuances of SQL 2008 Express but rather to explore the various layers of a complex .NET application in a pragmatic, approachable way.
I'm going to use the Active Record pattern because it allows flexibility that will be explored later on. An alternate and well-known approach is to generate strongly-typed DataSets using the tools in Visual Studio instead. You'll find information here and here as well as plenty more examples of that approach simply by searching. With the Active Record pattern used here, a data access class is built that models in code a single table. Essentially the class contains public properties corresponding to the columns in a table and methods for CRUD behavior of that data.
Creating an instance of an Active Record class means it will have one of two states: either with existing data loaded from storage or a new instance with default values (data does not exist in storage). Therefore, the constructors for the class are pretty straightforward:
  public Customer()
  {
    InitializeData();
  }
  public Customer(int customerId) : this()
  {
    Load(customerId);
  }
As you can see the default constructor creates an empty instance by calling InitializeData() while passing an identifier, customerId in this case, to the constructor causes the class to Load() the instance data from storage.
As mentioned, this class needs properties that correspond to the columns in its underlying table. A few properties are shown here:
  private System.Int32? _customerId;
  public System.Int32? CustomerId
  {
    get { return _customerId; }
	set { _customerId = value; }
  }

  private NameStyleValue _nameStyle;
  public NameStyleValue NameStyle
  {
    get { return _nameStyle; }
    set { _nameStyle = value; }
  }

  private System.String _title;
  public System.String Title
  {
    get { return _title; }
    set { _title = value; }
  }
For the purposes of this tutorial the properties are simple values that hold data. Of course, business requirements and local development standards may dictate that validation be included as well as other nifty things. Note that the first property shown, CustomerId, is nullable. This is a simple technique to indicate whether or not the instance contains new data that has never been written to the database (null value) or previously stored data that has been retrieved (not null). Remember, primary keys should not be nullable so this approach is sufficient. If you prefer to use GUIDs then simply make the data type System.Guid? instead.
The Load() method is called by one of the constructors to retrieve the instance data from underlying storage and populate the properties as shown here:
  public void Load(int customerId)
  {
    string sqlCommand = "SELECT " + _columnNames + " FROM Customer WHERE CustomerId=@CustomerId";

    Database db = DatabaseFactory.CreateDatabase(Settings.Default.DatabaseName);

    DbCommand dbCommand = db.GetSqlStringCommand(sqlCommand);

    db.AddInParameter(dbCommand, "CustomerId", DbType.Int32, customerId);

    using (IDataReader dataReader = db.ExecuteReader(dbCommand))
    {
      if (dataReader != null && dataReader.Read())
      {
        PopulateData(dataReader);
      }
    }
  }
At this point, I must take a detour from the code at hand to discuss the underlying data access logic. You can embed ADO.NET code directly in your data layer classes, or better yet put that logic into either a utility/helper class or a base class that all the data layer classes inherit from. You'll note that the p&p's architecture diagram shows these as additional "Data Helpers / Utilities". An alternative to writing all that low level plumbing is to use code that is already written, well tested, and vetted by hundreds of other developers which is what I've done. I'm using the pattern & practice group's Enterprise Library to provide the plumbing. Before you groan because of past experiences or snide comments you've heard from others I suggest you take another look at "EntLib". I've watched it "grow up" from the application block days of early .NET and it's become a mature, well-rounded, adult member of our little society. A lot of the dependencies that plagued earlier versions and forced an all-or-nothing approach have been removed. In fact, for this version of our .NET Adventure I'm only using the Data Access Application Block and nothing else. In future posts, I intend to swap out EntLib for other approaches to illustrate that it can be done and that the design techniques I've shown here make it feasible to do so.
Looking back at the code, notice that I'm using embedded SQL statements. I don't wish to engage in the well-worn debate of dynamic SQL vs. store procedures so please let's agree to get along - if I lose a few readers at this point, so be it. One of the reasons I used embedded SQL is because of SQL Compact Edition (SQLCE). As a light-weight, embedded database it has some compelling features but the tiny size comes with a price - it does not support stored procedures. Had I used stored procedures, I would have closed that door never to be opened again without a lot of effort. Not to mention that the various dialects of database code means that stored procedures are difficult to translate - I'm speaking from experience having written many procedures for SQL Server, Oracle, and DB2 which are conceptually similar but strikingly different in syntax and implementation. The dynamic SQL code shown above should support embedded databases as well as others vendors with little or no changes.
I won't go into the basics of the Enterprise Library classes - you can find plenty of examples online. The essence of the Load() method is that it takes a customer Id as a parameter, constructs an SQL SELECT statement filtered with a WHERE clause specifying the customer Id passed and uses a data reader to retrieve the row. If the row was retrieved (e.g. the customer exists) then the PopulateData() private method is called. You may wish to do something different such as throwing an exception or coding the method with a return value used to indicate success or failure. Also note that "_columnNames" used in building the SELECT clause is a string constant containing a comma-separated list of the column names.
PopulateData() simply copies the values returned in the DataRecord into the class instance properties:
  private void PopulateData(IDataRecord dataRecord)
  {
    _customerId = (int)dataRecord["CustomerId"];
    _nameStyle = (dataRecord.GetBoolean(1)) ? NameStyleValue.Eastern : NameStyleValue.Western;
    _title = (dataRecord["Title"] == DBNull.Value) ? null : (string)dataRecord["Title"];
    _firstName = (dataRecord["FirstName"] == DBNull.Value) ? null : (string)dataRecord["FirstName"];
    _middleName = (dataRecord["MiddleName"] == DBNull.Value) ? null : (string)dataRecord["MiddleName"];
    _lastName = (dataRecord["LastName"] == DBNull.Value) ? null : (string)dataRecord["LastName"];
    _suffix = (dataRecord["Suffix"] == DBNull.Value) ? null : (string)dataRecord["Suffix"];
    _companyName = (dataRecord["CompanyName"] == DBNull.Value) ? null : (string)dataRecord["CompanyName"];
    _salesperson = (dataRecord["SalesPerson"] == DBNull.Value) ? null : (string)dataRecord["SalesPerson"];
    _emailAddress = (dataRecord["EmailAddress"] == DBNull.Value) ? null : (string)dataRecord["EmailAddress"];
    _phone = (dataRecord["Phone"] == DBNull.Value) ? null : (string)dataRecord["Phone"];
    _passwordHash = (dataRecord["PasswordHash"] == DBNull.Value) ? null : (string)dataRecord["PasswordHash"];
    _passwordSalt = (dataRecord["PasswordSalt"] == DBNull.Value) ? null : (string)dataRecord["PasswordSalt"];
  }
One thing to note is that the _nameStyle property is using an enumeration called NameStyleValue which is included in the class and shown here:
  public enum NameStyleValue
  {
    Western,
    Eastern
  }
The AdventureWorks database uses a bit column to store the style of the name - Western (First Last) or Eastern (Last, First) so this enumeration is a convenience to make the property easier to work with in code.
To store the instance data into the backing storage system we expose a simple method called Store() shown here:
  public int Store()
  {
    if (_customerId == null)
      return StoreNew();
    else
      return UpdateExisting();
  }
Notice the test of the _customerId property to see if it's null - if so, we store a new instance and if not we update an existing instance. Both StoreNew() and UpdateExisting() are internal (private) methods which callers cannot access. Not only does this make the external, public interface to the Active Record class simple but it hides the internal details of what determines "newness" and the different ways the class needs to handle this. Conversely, exposing StoreNew() and UpdateExisting() means the burden is on the calling code to understand the nuances and invoke the proper method which makes the coupling between the data layer and above more brittle.
Let's take a look at the StoreNew() method shown here:
  private int StoreNew()
  {
    // construct insert statement

    StringBuilder sb = new StringBuilder();
    sb.Append("INSERT Customer (NameStyle,Title,FirstName,");
    sb.Append("MiddleName,LastName,Suffix,CompanyName,SalesPerson,");
    sb.Append("EmailAddress,Phone,PasswordHash,PasswordSalt) VALUES (");
    sb.Append("@NameStyle,@Title,@FirstName,@MiddleName,@LastName,");
    sb.Append("@Suffix,@CompanyName,@SalesPerson,@EmailAddress,");
    sb.Append("@Phone,@PasswordHash,@PasswordSalt");
    sb.Append(")");

    // execute insert

    Database db = DatabaseFactory.CreateDatabase(Settings.Default.DatabaseName);

    DbCommand dbCommand = db.GetSqlStringCommand(sb.ToString());

    db.AddInParameter(dbCommand, "NameStyle", DbType.Boolean, _nameStyle);
    db.AddInParameter(dbCommand, "Title", DbType.String, _title);
    db.AddInParameter(dbCommand, "FirstName", DbType.String, _firstName);
    db.AddInParameter(dbCommand, "MiddleName", DbType.String, _middleName);
    db.AddInParameter(dbCommand, "LastName", DbType.String, _lastName);
    db.AddInParameter(dbCommand, "Suffix", DbType.String, _suffix);
    db.AddInParameter(dbCommand, "CompanyName", DbType.String, _companyName);
    db.AddInParameter(dbCommand, "SalesPerson", DbType.String, _salesperson);
    db.AddInParameter(dbCommand, "EmailAddress", DbType.String, _emailAddress);
    db.AddInParameter(dbCommand, "Phone", DbType.String, _phone);
    db.AddInParameter(dbCommand, "PasswordHash", DbType.String, _passwordHash);
    db.AddInParameter(dbCommand, "PasswordSalt", DbType.String, _passwordSalt);

    int rowsAffected = db.ExecuteNonQuery(dbCommand);
    if (rowsAffected != 1)
    {
      throw new DataException("Failed to INSERT new Customer.");
    }

    // return customer id (more efficient to use sproc with SCOPE_IDENTITY() and out param)

    string sqlCommand = "SELECT CustomerId FROM Customer WHERE FirstName=@FirstName "
                      + "AND MiddleName=@MiddleName AND LastName=@LastName "
                      + "AND CompanyName=@CompanyName "
                      + "AND EmailAddress=@EmailAddress";

    dbCommand = db.GetSqlStringCommand(sqlCommand);
    db.AddInParameter(dbCommand, "FirstName", DbType.String, _firstName);
    db.AddInParameter(dbCommand, "MiddleName", DbType.String, _middleName);
    db.AddInParameter(dbCommand, "LastName", DbType.String, _lastName);
    db.AddInParameter(dbCommand, "CompanyName", DbType.String, _companyName);
    db.AddInParameter(dbCommand, "EmailAddress", DbType.String, _emailAddress);

    IDataReader dbReader = db.ExecuteReader(dbCommand);
    if (dbReader != null && dbReader.Read())
    {
      _customerId = (int)dbReader["CustomerId"];
    }

    return _customerId.Value;
  }
In summary, this code constructs an SQL INSERT statement using the property values to pass as parameters, executes the statement and then immediately retrieves the row just inserted. This flies in the face of the earlier discussion regarding dynamic SQL vs. stored procedures and may be a compelling reason for you to go the stored procedure route. As soon as the INSERT statement executes there is a mismatch between the row stored in the database and the class instance in memory, specifically the customer id value. The AdventureWorks database uses a default constraint of NEWID() to generate the primary key value which we don't have visibility over. We cannot leave things this way - otherwise we'd have an instance in memory with no primary key while the row in the database has one. As we showed earlier, the primary key is used to determine "newness" - null means it's a new instance and at this moment it is still null. There are a couple of ways to solve this problem. One way is, of course, to switch from using dynamic SQL to using a stored procedure so that the logic inside the procedure can issue a SCOPE_IDENTITY() function call to retrieve the newly generated primary key and return it to the caller (our code here) as an out parameter. Another approach would be to define the primary keys as GUIDs which we could generate in our C# code within the StoreNew() method thus the instance data in memory and the row in the database would have the same value and be identical. Finally, it's worth noting that we could stick with dynamic SQL and wrap the two database calls inside a transaction so that other processes wouldn't "see" the newly inserted row until we read it back to retrieve the customer id. Once that was done we could commit the transaction and both the in-memory and in-storage versions would be the same.
UpdateExisting isn't worth showing here so I'll just describe it briefly. Rather than constructing an INSERT statement it constructs an UPDATE statement with a bunch of SETs for each column.
To recap, I've shown an implementation of the Active Record pattern that supports the following:
- Exposes properties corresponding to the columns in the underlying database table that callers can manipulate.
- Created two constructors - an empty (default) constructor that initializes a new instance and a second one that takes a primary key identifier and uses it to retrieve the instance values from a row in the underlying database table.
- Created Delete (not shown), Load, and Store methods to enable CRUD behavior.
The next installment will be a bit shorter - I'll cover writing unit tests for this data layer class so we can quickly flush out any problems. In addition, I'll briefly mention FxCop and what it can do for us. In the future we will revise this Active Record class as the needs of the other layers drive us to do more.
The code for the project can be downloaded from here.
Subscribe to:
Posts (Atom)